Category: Linked Data

How to (easily) publish your ontology permanently: OnToolgy and w3id

How to (easily) publish your ontology permanently: OnToolgy and w3id

I have recently realized that I haven’t published any post for a while, so I don’t think there is a better way to start 2017 than with a small tutorial: how to mint w3ids for your ontologies without having to issue pull requests on Github.

In a previous post I described how to publish vocabularies and ontologies in a permanent manner using w3ids. These ids are community maintained and are a very flexible approach, but I have found out that doing pull requests to the w3id repository may be a hurdle for many people. Hence, I have been thinking and working towards lowering this barrier.

Together with some colleagues from the Universidad Politecnica de Madrid, we released a year and a half ago a tool for helping documenting and evaluating ontologies: OnToology. Given a Github repository, OnToology tracks all your updates and issues pull requests with their documentation, diagrams and evaluation. You can see a step by step tutorial to set up and try OnToology with the ontologies of your choice. The rest of the tutorial assumes that your ontology is tracked by OnToology.

So, how can you mint w3ids from OnToology? Simple, go to “my repositories tab:

fig1

Then expand your repository:

repo

And select “publish” on the ontology you want to mint a w3id:

publish

Now OnToology will request a name for your URI, and that’s it! The ontology will be published under the w3id that appears below the ontology you selected. In my case I selected to publish the wgs84 ontology under the “wgstest” name:

published

As shown in the figure, the ontology will be published under “https://w3id.org/def/wgstest”

If you want to update the html in Github and want to see the changes updated, you should click on the “republish” button that now replaces the old “publish” one:

republish

Right now the ontologies are published on the OnToology server, but we will enable the publication in Github by using Github pages soon. If you want the w3id to point somewhere else, you can either contact us at ontoology@delicias.dia.fi.upm.es, or you can issue a pull request to w3id adding your redirection before the 302 redirection in our “def” namespace: https://github.com/perma-id/w3id.org/blob/master/def/.htaccess

Elevator pitch

While being a PhD student, many people have asked me about the subject of my thesis and the main ideas behind my research. As a student you always think you have very clear what you are doing, at least until you have to actually explain it to someone who is not related to your domain. In fact, it is about using the right terminology. If you say something like “Oh yeah, I am trying to detect abstractions on scientific workflows semi-automatically in order to understand how they can better be reused and related to each other”, people will look at you as if you didn’t belong to this planet. Instead, something like “detecting commonalities in scientific experiments in order to study how we can understand them bettermight be more appropriate.

But last week the challenge was slightly different. I was invited to give an overview talk about the work I have been doing as a PhD student. And that is not only what I am doing, but why am I doing it and how is it all related without going into the details of every step. It may appear as an easy task, but it kept me thinking more than I expected.

As I think some people might be interested in a global overview, I want to share the presentation here as well: http://www.slideshare.net/dgarijo/from-scientific-workflows-to-research-objects-publication-and-abstraction-of-scientific-experiments. Have a look!

Rohub.linkeddata.es

The last 3 years I have been involved in the Wf4Ever project, which has developed the notion of Research Objects and their respective models (previously introduced another post). Lately I have been exploring new ways for eating my own dog food by associating Research Objects to my papers as HTML web pages (see an example here). These Research Objects are useful, as they serve as summary for the paper in question, and they have pointers to all the datasets, queries and additional materials that I could not include in the paper.

However, I realized that I spent a lot of time creating them and annotating them. Therefore during last Christmas I have created a Research Object Creator tool, which takes as input a LaTeX file and extracts its title and abstract to create an annotated page in rdf-a. It also produces a structure of the contents to reference, so you only have to fill in (and annotate if you want) the resources to point to. A sample can be seen in the image below:

RO
A Sample Research Object generated by the tool

The tool is available in Github, so if you want to try it out with a LaTeX paper click on the following link: https://github.com/dgarijo/Latex2RO.

Finally, I have also created a landing page for showing the current catalog of Research Objects: http://rohub.linkeddata.es/. The page is generated automatically and given a URI of a Research Object, it extracts its title and abstract from the rdf-a descriptions. If you want to contribute with new URIs, modify the Constants file in the Github project (https://github.com/dgarijo/rohub.linkeddata.es/tree/master/src/main/java/com/oeg/rohubweb) and I will recreate the landing page. Note that for this project I have used the Semargl rdf-a parser (http://semarglproject.org/), which is a little bit strict when parsing the HTML pages. If your Research Object has any markup mistakes, the parser will fail.

How to (properly) publish a vocabulary or ontology in the web (part 6 of 6)

And we finally arrive to the last part of the tutorial, which is a set of guidelines on how to reuse other vocabularies (i.e., how your vocabulary should link to other vocabularies). Reuse is not only related to publication, but also to the design of your own vocabulary. As a researcher, everyone knows that it is better not to reinvent the wheel. If an existent vocabulary covers with its terms part of what you want to cover in your competency questions (or system requirements), why should you redefine the same terms again and again?

In order to avoid this issue, you can either import that vocabulary into yours, which will bring the whole imported vocabulary as part of your ontology (like a module), or you could either extend only those properties and classes that you are going to reuse, without adding all the terms of the reused vocabulary as part of your ontology.

Which way is better? It depends: on one hand, I personally like to extend the vocabularies that I reuse when the terms being expanded are not many. Importing a vocabulary often makes it more difficult to present, and for someone loading the ontology, it could be very confusing to browse across many terms not being used in my domain.

Reusing concepts from other ontologies simplifies your domain model, as you import just those being extended.

On the other hand, if you plan to reuse most of the vocabulary being imported, for example by creating a profile of a vocabulary for a specific domain, the import option is the way to go.

Importing an ontology makes it on one hand easy to reuse, but on the other (in some cases) it makes your ontology more difficult to understand.

Another advice is to be careful with the semantics. I personally don’t like to mess up with the concepts defined by other people. If you need to add your own properties taking as domain or ranges classes defined by other people, you should specialize those classes in your ontology. Imagine an example where I want to reuse the generic concept from the PROV ontology prov:Entity for refering to the provenance of digital entities (which is my sample domain). If I want to add a property that has domain digital entity (like hasSize), then I should specialize the term prov:Entity with a subclass for my domain (in this case digitalEntity subClassOf Entity). If I just assert properties on the general term (prov:Entity) then I may be overextending my property to other domains than those I may have thought, and what is worse: I may be modifying a model which I haven’t defined originally.

But where to start looking if you want to reuse a vocabulary? There are several options:

  • Linked Open Vocabularies (LOV ): A set of common vocabularies that are distributed and organized in different categories. Different metrics for each vocabulary are displayed regarding its metadata and reuse, which will help you to determine whether it is still in unse or not.
  • The W3C standards: When building a vocabulary it is allways good to look up if a standard on that domain already exists!
  • Swoogle and Watson will allow you to search for terms on your domain and suggest you existent approaches.

With this post the tutorial ends. I hope it served to clarify at least a couple of things regarding vocabulary/ontology publication in the web. If you have any questions please leave them on the comments and I’ll be happy to help you.

Do you want more information regarding ontology importing and reuse? Check out these papers (thanks Maria and Melanie for the pointers):

This is part of a tutorial divided in 7 parts:

  1. Overview of the tutorial.
  2. (Reqs addressed A1(partially), A2, A3, A4, P1) Publishing your vocabulary at a stable URI using RDFS/OWL.
  3. (Reqs addressed P2, P3). How to design a human readable documentation.
  4. Extra: A tool for creating html readable documentation
  5. (Reqs addressed P4). Derreferencing your vocabulary
  6. (Reqs addressed A1 (partially)). Dealing with the license
  7. (Reqs addressed A5, P5). Reusing other vocabularies. (This post)

How to (properly) publish a vocabulary or ontology in the web (part 5 of 6)

This week I want to quickly introduce how and why you should include a license in your vocabulary and documentation. Since this subject has been already dealt with, I am mainly going to be providing links to posts describing these matters in detail.

Why should you add a license to your ontologies? Because if others want to reuse your vocabulary or ontology, the license will clarify what are they allowed doing with it according to the law (for instance, if they have to give attribution to your work). Remember that you are the intellectual author and you have the rights over the resource being published. See more details and types of licenses here.

How can you specify a license? You can add it as a semantic description to the ontology/vocabulary. Two widely used properties are dc:rights and dc:license, from the Dublin Core vocabulary. These properties can be used to describe the OWL file being produced, or in the documentation itself with annotations in RDF-a or microdata. See how it can be done here.

Spend some time analyzing which is the most appropriate license for your work. It may help you and many others in the future! If you are confused on which license to use, this is the one which we use on our vocabularies: http://creativecommons.org/licenses/by-nc-sa/2.0/.

This is part of a tutorial divided in 7 parts:

  1. Overview of the tutorial.
  2. (Reqs addressed A1(partially), A2, A3, A4, P1) Publishing your vocabulary at a stable URI using RDFS/OWL.
  3. (Reqs addressed P2, P3). How to design a human readable documentation.
  4. Extra: A tool for creating html readable documentation
  5. (Reqs addressed P4). Derreferencing your vocabulary
  6. (Reqs addressed A1 (partially)). Dealing with the license. (this post)
  7. (Reqs addressed A5, P5). Reusing other vocabularies. (To appear)

How to (properly) publish a vocabulary or ontology in the web (part 4 of 6)

(Update: purl.org seems to have stopped working. I recommend you to have a look at my latest post for doing content negotiation with w3id)

After a long summer break in blogging, I’m committed to finishing this tutorial. In this post I’ll explain why and how to dereference your vocabulary when publishing it in the Web.

But first, why should you dereference your vocabulary? In part 2 I showed how to create a permanent URL (purl) and redirect it to the ontology/vocabulary we wanted to publish (in my case it was http://purl.org/net/wf-motifs). If you followed the example you would have seen that now when you enter the purl you created in the web browser it redirects you to the ontology file. However if you enter http://purl.org/net/wf-motifs you will be redirected to the html documentation of the ontology. When entering the same URL in Protégé, the ontology file will be loaded in the system. By dereferencing the motifs vocabulary I am able to choose what to deliver depending on the type of request received by the server on a single resource: RDF files for applications and nice html pages for the people looking for information about the ontology (structured content for machines, human readable content for users).

Additionally, if you have used the tools I suggested in previous posts, when you ask for a certain concept the browser will take you to the exact part of the document defining it. For example, if you want to know the exact definition for the concept “FormatTransformation” in the Workflow Motif ontology, then you can paste its URI (http://purl.org/net/wf-motifs#FormatTransformation) in the web browser. This makes the life easier for users when browsing and reading your ontology.

And now, how do you dereference your vocabulary? First, you should set the purl redirection as a redirection for Semantic Web resources (add a 303 redirection instead a 302, and add the target URL where you plan to do the redirection). Note that you can only dereference a resource if you control the server where the resources are going to be delivered. The screenshot below shows how it would look in purl for the Workflow Motifs vocabulary. http://vocab.linkeddata.es/motifs is the place our system admin decided to store the vocabulary.

Purl redirection
Purl redirection

Now you should add the redirection itself. For this I always recommend having a look into the W3C documents, which will guide you step by step on how to achieve this. In this case in particular we followed http://www.w3.org/TR/swbp-vocab-pub/#recipe3, which is a simple redirection for vocabularies with a hash namespace. You have to create an htaccess file similar to the one pasted below. In my case the index.html file has the documentation of the ontology, while motif-ontology1.1.owl contains the rdf/xml encoding. If a ttl file exists, you can also add the appropriate content negotiation. All the files are located in a folder called motifs-content, in order to avoid an infinite loop when dealing with the redirections of the vocabulary:

# Turn off MultiViews
Options -MultiViews

# Directive to ensure *.rdf files served as appropriate content type,
# if not present in main apache config
AddType application/rdf+xml .rdf
AddType application/rdf+xml .owl
#AddType text/turtle .ttl #<---Add if you have a ttl serialization of the file

# Rewrite engine setup
RewriteEngine On
RewriteBase /def

# Rewrite rule to serve HTML content from the vocabulary URI if requested
RewriteCond %{HTTP_ACCEPT} !application/rdf\+xml.*(text/html|application/xhtml\+xml)
RewriteCond %{HTTP_ACCEPT} text/html [OR]
RewriteCond %{HTTP_ACCEPT} application/xhtml\+xml [OR]
RewriteCond %{HTTP_USER_AGENT} ^Mozilla/.*
RewriteRule ^motifs$ motifs-content/index.html

# Rewrite rule to serve RDF/XML content from the vocabulary URI if requested
RewriteCond %{HTTP_ACCEPT} application/rdf\+xml
RewriteRule ^motifs$ motifs-content/motif-ontology1.1.owl [R=303]

# Rewrite rule to serve turtle content from the vocabulary URI if requested
#RewriteCond %{HTTP_ACCEPT} text/turtle
#RewriteRule ^motifs$ motifs-content/motifs_ontology-ttl.ttl [R=303]

# Choose the default response
# ---------------------------

# Rewrite rule to serve the RDF/XML content from the vocabulary URI by default
RewriteRule ^motifs$ motifs-content/motif-ontology1.1.owl [R=303]

Note the redirections when the owl is being requested. If you have a slash vocabulary, you will have to follow the aforementioned W3C document for further instructions.

Now it is time to test that everything works. The easiest way is just to paste the URI of the ontology in Protégé and in your browser and check that in one case it loads the ontology properly and in the other you can see the documentation. Another possibility is to use curl like this: curl -sH “Accept: application/rdf+xml” -L http://purl.org/net/wf-motifs (for checking that the rdf is obtained) or curl -sH “Accept: text/html” -L http://purl.org/net/wf for the html.

Finally, you may also use the Vapour validator to check that you have done the process correctly. After entering your ontology URL, you should see something like this:

Vapur validation
Vapur validation

Congratulations! You have dereferenced your vocabulary successfully 🙂

This is part of a tutorial divided in 7 parts:

  1. Overview of the tutorial.
  2. (Reqs addressed A1(partially), A2, A3, A4, P1) Publishing your vocabulary at a stable URI using RDFS/OWL.
  3. (Reqs addressed P2, P3). How to design a human readable documentation.
  4. Extra: A tool for creating html readable documentation
  5. (Reqs addressed P4). Derreferencing your vocabulary (this post)
  6. (Reqs addressed A1 (partially)). Dealing with the license. (To appear)
  7. (Reqs addressed A5, P5). Reusing other vocabularies. (To appear)

How to (properly) publish a vocabulary or ontology in the web (part 3.5 of 6)

This is a short post that I want to write to expand on my previous part of the tutorial (how to create a nice human readable documentation for your vocabulary/ontology). Since I have been releasing some vocabularies lately, I have developed a simple tool that generates the main structure of an html document describing the resource with the 11 parts I introduced on my previous post (title and date, metadata, abstract, table of contents, introduction, namespace declarations, overview of classes and properties, description, Cross reference section, references and acknowledgements).

This tool does not intend to replace any of the other tools designed to describe the properties and classes of an ontology. In fact, it rather acts as wrapper using LODE for that very purpose in one of the sections (the cross reference section). So, why should you use it?

  1. It saves time by providing the whole structure of the html document.
  2. It doesn’t require you to add any RDF metadata to the ontology being described. The URI of the ontology itself is optional. All metadata can be configured in the config.properties file of the project (see readme for more info).
  3. It automatically adds the metadata as rdf-a annotations to the document, which makes it easier to parse by machines.

I have uploaded the tool to Github, and it’s available here, along with the code I used.

As stated, I have used LODE for one of the sections of the document. I have already added LODE in the acknowledgements. If you use this tool please make sure to acknowledge any tool you use to generate your documentation.

This is part of a tutorial divided in 7 parts:

  1. Overview of the tutorial.
  2. (Reqs addressed A1(partially), A2, A3, A4, P1) Publishing your vocabulary at a stable URI using RDFS/OWL.
  3. (Reqs addressed P2, P3). How to design a human readable documentation.
  4. Extra: A tool for creating html readable documentation (this post)
  5. (Reqs addressed P4). Derreferencing your vocabulary.
  6. (Reqs addressed A1 (partially)). Dealing with the license. (To appear)
  7. (Reqs addressed A5, P5). Reusing other vocabularies. (To appear)

How to (properly) publish a vocabulary or ontology in the web (part 3 of 6)

This part of the tutorial explains how to design a human readable documentation. When browsing an ontology, it is very important to provide accurate definitions and examples of how to use it. If these are not provided, the ontology will be very difficult to reuse. Having a documentation easy to navigate, which explains every concept and relationship separately and which presents an overview and examples improves the understandability of the whole ontology to other people.

Some people address this step by pointing to a report/deliverable/paper where the ontology is described. Although this helps, it is not easy to navigate and will drive crazy any final user. I don’t recommend it. Furthermore, according to my experience, if the ontology is documented in a paper then the information will be of little use.

Making a proper documentation is difficult and takes time. Fortunately, there are some tools to help you overcome this task, like LODE, Parrot, OWLDoc, neologism, Ontospec, etc. I have worked with LODE, Parrot and OWLDoc, so I will only cover these here:

  • LODE: For me it’s the best of the tools I’ve tried. It is a web service that takes as input an owl file and generates an html. The html is W3C-style with the definition of each of the terms extracted from the domain, ranges and metadata of your owl file. If you extract the appropriate bits you can automatically create templates to customize your documentation with additional images, explanations and examples (like this one).
  • Parrot: Very similar to LODE, although the styles used are different and you have to clean some of the properties not defined within the namespace of your ontology (like the ones used to add metadata). It works really well, and my choice picking LODE instead of Parrot is a matter of styles.
  • OWLDoc: NeOn Toolkit plug-in that generates an owl documentation javadoc style from your .owl file. I don’t personally like it much, as customizing it is a bit of a pain.

Once you have your html template from one of these tools (with all the concepts of the ontology fully covered), you should add sections describing an overview of the model and examples. My suggestion is to follow the structure of W3C documents, namely:

  1. Title and date of the release.
  2. Metadata: Authors, contributors, version, imported ontologies, license, link to previous version, link to the latest version.
  3. Abstract: small summary of your ontology in 2 lines. I recommend pointing to the owl file here as well.
  4. Table of contents of your html document.
  5. Introduction: provide context to the ontology. What are its goals and the benefits of using it?.
  6. Namespace declarations: Namespace URIs of all the vocabularies used within the document (this could be found at the end as well).
  7. Overview of classes and properties: Very small section with the list of tables and properties of the ontology, for making the navigation easier to the reader.
  8. Description: Diagram of the ontology concepts, relationships and how they are related to each other. Usage examples might help clarifying things as well.
  9. Cross reference section: this is the section automatically generated by the tools covered above. Just copy what they generated J
  10. References.
  11. Acknowledgements, specially remember to include the developers of the tools you have used.

Want to see some examples? Check PROV (W3C), some commonly used vocabularies like foaf or Dublin Core (which cover the points listed above with their own structure) or some of the ontologies I’ve been publishing, like p-plan or wf-motifs. Note that the order in which the points of the list appear is not mandatory. Modify it in order to make your ontology easier to use to the final user!

This is part of a tutorial divided in 7 parts:

  1. Overview of the tutorial.
  2. (Reqs addressed A1(partially), A2, A3, A4, P1) Publishing your vocabulary at a stable URI using RDFS/OWL.
  3. (Reqs addressed P2, P3). How to design a human readable documentation.  (this post)
  4. Extra: A tool for creating html readable documentation
  5. (Reqs addressed P4). Derreferencing your vocabulary.
  6. (Reqs addressed A1 (partially)). Dealing with the license. (To appear)
  7. (Reqs addressed A5, P5). Reusing other vocabularies. (To appear)


How to (properly) publish a vocabulary or ontology in the web (part 2 of 6)

This part of the tutorial explains how to publish your vocabulary at a stable URI using RDFS/OWL. In order to make things easier, I’ll illustrate each step of this part of the tutorial with an example. The steps to follow are further described below:

1)      Select the name of your vocabulary/ontology. Easy, right? In my case I want to publish an ontology encoding the workflow motif catalogue we describe in this paper, so the name I have chosen is “The workflow motif ontology” (wf-motifs to keep it short).

2)      Select the proper URI to publish your vocabulary. Now that we know how we want to name our vocabulary, things start to get trickier. Which URI do we choose? How do we ensure that it is not going to change?
The URI you choose for your ontology should be permanent and defined in a domain you control. The rationale behind this is simple: imagine that somebody is reusing the concepts defined in your ontology and you change its URI. The person reusing your ontology will no longer know the proper definitions and semantics of the reused term.
Since I assume that most of the people reading this are not willing to pay for a new domain each time a new ontology is published, I recommend defining the URI of your vocabularies/ontologies in http://purl.org. PURL stands for “persistent uniform resource locator”, and they are widely used to give persistent URIs to resources. Once you register in the page, the process is really simple. You define a new domain, wait for the approval and create the URI for your ontology. In my case it is: http://purl.org/net/wf-motifs.

EDIT: If you are interested in having more control on your redirections, w3id is a better alternative to purl. Have a look at my post for more information on how to set it up.

Note 1: If you create the name under the /net/ domain things will go faster, since it is the default domain. Otherwise they’ll have to approve the domain AND the name of your vocabulary/ontology.

Note 2: Someone could argue that by speaking to the system admin of your enterprise/university you can obtain the vocabulary URI as well. However, depending on who you are and the ontology you are working on, the URI they suggest could be something like: mayor2.dia.fi.upm.es/oeg-upm/files/dgarijo/wf-motifs. This is perfectly fine, but this looks more like the place where my .owl will finally be stored. If my file has to be moved, my URI will change. Using purl ensures the URI will be permanent, and that I have control over it.

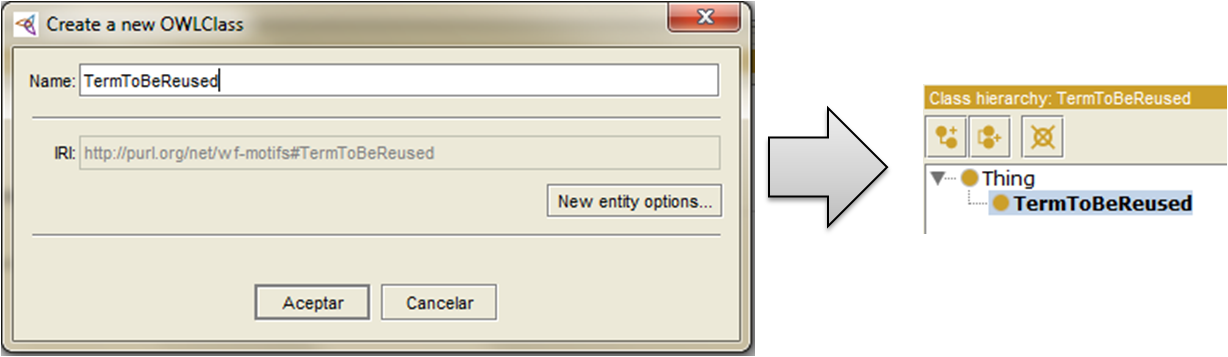
3)      Create the ontology in RDF/OWL: There are several editors to create vocabularies/ontologies and their properties according to the W3C standards: Protégé, the NeOn Toolkit, TopBraid Composer, etc. The one I’m most familiar to is Protégé, which is free to install and use (they say that TopBraid is very good, but since the license is quite expensive I haven’t been able to test it).  Once you have installed your editor you just have to change the base URI of the ontology (Ontology IRI in Protégé) with the one you registered as a PURL. Protégé will use a hash (“#”) by default to identify the classes and properties you declare in the vocabulary/ontology. You can use a slash (“/”) for this purpose as well.

Hash versus slash debate: There has been a long discussion regarding the usage of “/” vs “#”. If you are not sure about which one is the best for your vocabulary/ontology, here is a tip: if your ontology will be huge and will be divided in many different modules, use “/”. Otherwise use “#”. It is easier to set up and will make it easier to point to the right spot in the documentation.

Returning back to the example, this is how my ontology IRI looks like:
http://purl.org/net/wf-motifs#
and a sample class will be
http://purl.org/net/wf-motifs#Motif

4)      Redirect your permanent URI to your vocabulary/ontology file. Once you are done editing your vocabulary/ontology, you have to host the .owl file somewhere. It is not important where you host it, as long as you know that it won’t be deleted. It’s fine if it gets moved, as long as you know where. In my case, I talked to the system admin and he stored the owl file here:
http://vocab.linkeddata.es/motifs/motif-ontology1.1.owl
Finally, we go back to the purl page and we add the basic redirection to the target URL we have just set up. The form looks like this:purl

Now whenever we enter the URI of our ontology, it will be redirected to the OWL file. Congrats!
Note: In my case http://purl.org/net/wf-motifs will take you to the ontology if you load it in Protégé and to the documentation if you load it from the web browser. I’ll explain how to achieve that in part 4 of the tutorial, so don’t worry for the moment.

Note: the steps I propose here are not normative. There may be other ways to achieve what is covered here. This is just a possible way to do it.

This is part of a tutorial divided in 7 parts:

  1. Overview of the tutorial.
  2. (Reqs addressed A1(partially), A2, A3, A4, P1) Publishing your vocabulary at a stable URI using RDFS/OWL. (this post)
  3. (Reqs addressed P2, P3). How to design a human readable documentation.
  4. Extra: A tool for creating html readable documentation.
  5. (Reqs addressed P4). Derreferencing your vocabulary.
  6. (Reqs addressed A1 (partially)). Dealing with the license.
  7. (Reqs addressed A5, P5). Reusing other vocabularies.